Making Your Embedded Screens Disco
CONCEPTUALIZATION [Medium: Success] — The world is gray enough, detective. These tiny displays deserve splashes of glory, little rectangles of light brimming with disco. Make them shine like the last good thought in a hangover.
Introduction
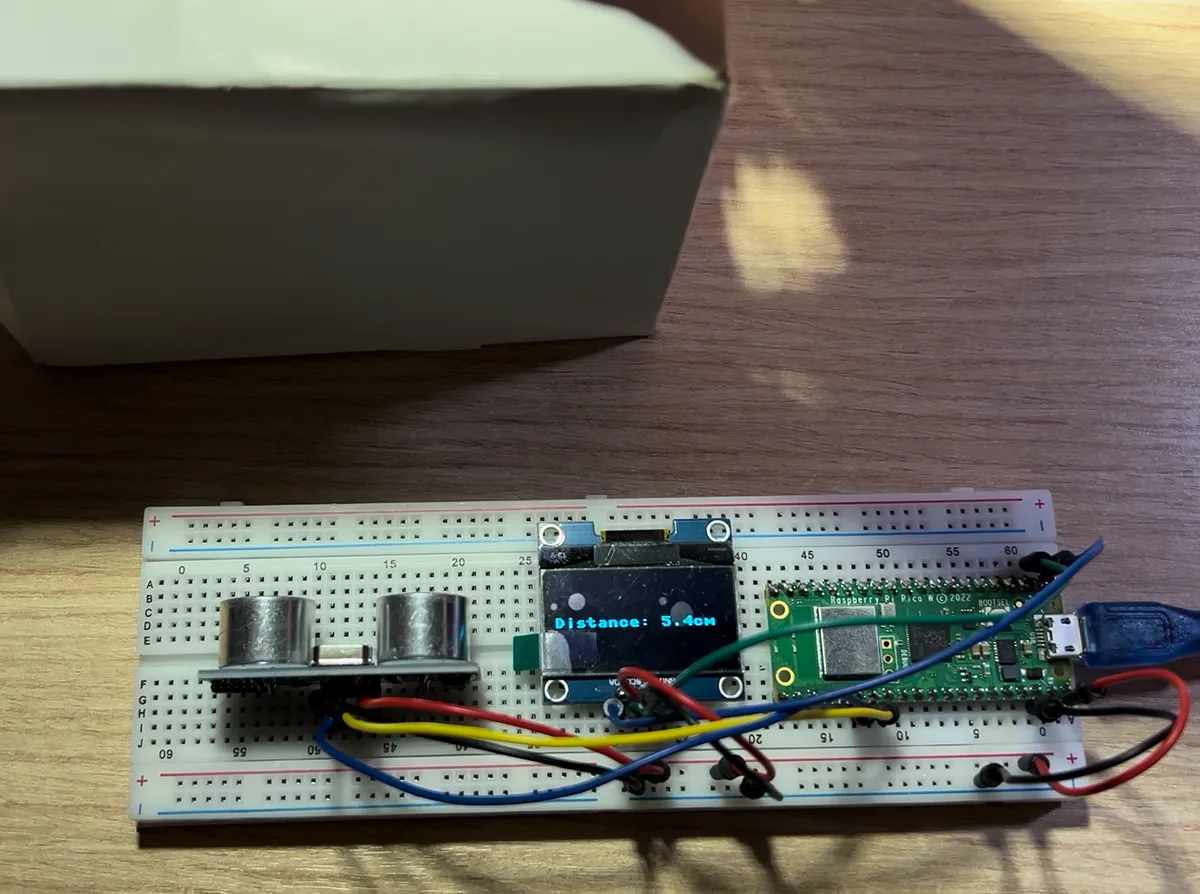
When I first got into hardware and embedded systems, my journey began like everyone else's—blinking an LED on my board, the hardware equivalent of printing "Hello World." Empowered by this tiny accomplishment, I explored my starter kit and discovered two interesting components: an Ultrasonic Distance Sensor (HC-SR04) and a monochrome OLED display (128x64).
I immediately connected them, wrote some code, and was presented with... boring numbers on a plain screen. Just distance readings. Functional? Yes. Exciting? Not even slightly.
This led me to wonder: "How can I display images on these small screens?" There must be a way! I think it's natural for beginners to crave visual feedback—it's why web development is so popular. It's easier to comprehend something when you can see it rather than just reading terminal output.
A few Google searches and forum dives later, I discovered that yes, you absolutely can display images on these small screens. You just need to convert them into byte arrays.
LOGIC [Easy: Success] — A byte array, simply put, is a collection of 8-bit values (0-255) that represent your image pixel by pixel. On a monochrome display, each bit corresponds to either an "on" or "off" pixel, allowing you to represent any black and white image with remarkable precision.
Image to Bytes Array: The Digital Alchemy
VISUAL CALCULUS [Medium: Success] — See how the pixels form a pattern? Each byte represents eight horizontal dots. The display reads these like ancient runes, deciphering your artistic intent one byte at a time. 01001001 — another row of your masterpiece revealed.
Converting images to byte arrays might sound complicated, but there's a fantastic tool called image2cpp that does all the heavy lifting. This online converter takes your image as input and outputs Arduino-compatible code containing the byte representation of your image.
The process is beautifully simple:
- Prepare your image (ideally matching your display's dimensions and using only black and white)
- Upload it to image2cpp
- Configure the settings (horizontal vs. vertical byte orientation)
- Generate the code
- Copy and paste into your project
// 'gm_machine', 128x64px
const unsigned char epd_bitmap_gm_machine [] PROGMEM = {
	0x00, 0x00, 0x00, 0x00, 0x00, 0x00, 0x00, 0x00, 0x00, 0x00, 0x00, 0x00, 0x00, 0x00, 0x00, 0x00,
	0x00, 0x00, 0x00, 0x00, 0x00, 0x00, 0x00, 0x00, 0x00, 0x00, 0x00, 0x00, 0x00, 0x00, 0x00, 0x00,
	0x00, 0x00, 0x00, 0x00, 0x00, 0x00, 0x00, 0x00, 0x00, 0x00, 0x00, 0x00, 0x00, 0x00, 0x00, 0x00,
	0x00, 0x00, 0x00, 0x00, 0x00, 0x00, 0x00, 0x00, 0x00, 0x00, 0x00, 0x00, 0x00, 0x00, 0x00, 0x00,
	0x00, 0x00, 0xc0, 0x0f, 0x80, 0x13, 0x00, 0x00, 0x00, 0x00, 0x00, 0x00, 0x00, 0x00, 0x00, 0x00,
	0x00, 0x00, 0xe0, 0x1f, 0xc0, 0x63, 0x00, 0x00, 0x00, 0x00, 0x00, 0x00, 0x00, 0x00, 0x00, 0x00,
	0x00, 0x00, 0xf8, 0x7f, 0xf0, 0x5f, 0x00, 0x00, 0x00, 0x00, 0x00, 0x00, 0x00, 0x00, 0x00, 0x00,
	0x00, 0x00, 0xfc, 0xff, 0xf8, 0xff, 0x00, 0x00, 0x00, 0x00, 0x00, 0x00, 0x00, 0x00, 0x00, 0x00,
	0x00, 0x00, 0xfe, 0xff, 0xfd, 0xff, 0x01, 0x00, 0x00, 0x00, 0x00, 0x00, 0x00, 0x00, 0x00, 0x00,
	0x00, 0x80, 0xff, 0xff, 0xff, 0xff, 0x01, 0x00, 0x00, 0x00, 0x00, 0x00, 0x00, 0x00, 0x00, 0x00,
	0x00, 0x80, 0xbf, 0x01, 0xf8, 0xff, 0x07, 0x00, 0x00, 0x00, 0x00, 0x00, 0x00, 0x00, 0x00, 0x00,
	0x00, 0xc0, 0xdf, 0xbe, 0x9f, 0x07, 0x1e, 0x00, 0x00, 0x00, 0x00, 0x00, 0x00, 0x00, 0x00, 0x00,
	0x00, 0xc0, 0xff, 0x43, 0xf0, 0x03, 0x14, 0x00, 0x00, 0x00, 0x00, 0x00, 0x00, 0x00, 0x00, 0x00,
	0x00, 0xe0, 0xff, 0xff, 0xf7, 0xff, 0x2b, 0x00, 0x00, 0x00, 0x00, 0x00, 0x00, 0x00, 0x00, 0x00,
	0x00, 0xe0, 0xff, 0xff, 0xf7, 0xff, 0x5f, 0x00, 0x00, 0x00, 0x00, 0x00, 0x00, 0x00, 0x00, 0x00,
	0x00, 0xf0, 0xff, 0xff, 0x2f, 0xff, 0xb7, 0x00, 0x00, 0x00, 0x00, 0x00, 0x00, 0x00, 0x00, 0x00,
	0x00, 0xfc, 0xff, 0x7f, 0xbe, 0xff, 0xff, 0x00, 0x00, 0x00, 0x00, 0x00, 0x00, 0x00, 0x00, 0x00,
	0x00, 0xfe, 0xff, 0x7f, 0xb0, 0xff, 0xff, 0x00, 0x00, 0x00, 0x00, 0x00, 0x00, 0x00, 0x00, 0x00,
	0x00, 0xff, 0xef, 0x80, 0x3f, 0x00, 0x00, 0x01, 0x00, 0x00, 0x00, 0x00, 0x00, 0x00, 0x00, 0x00,
	0x00, 0xff, 0x4f, 0x80, 0x7f, 0x00, 0x00, 0x01, 0x00, 0x00, 0x00, 0x00, 0x00, 0x00, 0x00, 0x00,
	0x80, 0xff, 0x1f, 0x3f, 0xfb, 0xff, 0xec, 0x01, 0x00, 0x00, 0x00, 0x00, 0x00, 0x00, 0x00, 0x00,
	0x80, 0xff, 0x7f, 0x1c, 0xf0, 0x7f, 0xc0, 0x00, 0x00, 0x00, 0x00, 0x00, 0x00, 0x00, 0x00, 0x00,
	0xc0, 0xff, 0xff, 0x4c, 0xf0, 0x7f, 0x81, 0x00, 0x00, 0x00, 0x00, 0x00, 0x00, 0x00, 0x00, 0x00,
	0xc0, 0xff, 0xff, 0x43, 0xd0, 0x7f, 0x41, 0x00, 0x00, 0x00, 0x00, 0x00, 0x00, 0x00, 0x00, 0x00,
	0xc0, 0xff, 0xff, 0x0f, 0x00, 0x00, 0x20, 0x00, 0x00, 0x00, 0x00, 0x00, 0x00, 0x00, 0x00, 0x00,
	0xe0, 0xff, 0xff, 0xff, 0x9f, 0xff, 0x13, 0x00, 0x00, 0x00, 0x00, 0x00, 0x00, 0x00, 0x00, 0x00,
	0xe0, 0xff, 0xff, 0xff, 0x43, 0xfe, 0x0b, 0x18, 0x00, 0x03, 0x00, 0x00, 0xc0, 0x63, 0x8c, 0x07,
	0xf0, 0xff, 0xff, 0xff, 0xe0, 0x00, 0x04, 0x00, 0x06, 0x03, 0x00, 0x00, 0x60, 0x66, 0xcc, 0x0c,
	0xf8, 0xff, 0xff, 0x0f, 0xf8, 0x01, 0x04, 0x18, 0x1f, 0xc3, 0x03, 0x3c, 0x60, 0xe0, 0x0e, 0x0c,
	0xf8, 0xff, 0xff, 0x0f, 0xfe, 0xff, 0x0b, 0x18, 0x06, 0x60, 0x06, 0x66, 0x60, 0xe0, 0x0f, 0x06,
	0xf8, 0xff, 0xff, 0xff, 0xff, 0xff, 0x17, 0x18, 0x06, 0x60, 0x00, 0x60, 0x60, 0x67, 0x0d, 0x03,
	0xf8, 0xff, 0xff, 0xff, 0xff, 0xff, 0x17, 0x18, 0x06, 0xc0, 0x03, 0x7c, 0x60, 0x66, 0x0c, 0x03,
	0xf8, 0xff, 0xff, 0xff, 0xff, 0xff, 0x3f, 0x18, 0x06, 0x00, 0x06, 0x66, 0x60, 0x66, 0x0c, 0x03,
	0xf8, 0xff, 0xff, 0xff, 0xff, 0xff, 0x3f, 0x18, 0x06, 0x60, 0x06, 0x66, 0x60, 0x66, 0x0c, 0x00,
	0xf8, 0xff, 0x1f, 0x80, 0xff, 0xff, 0x2f, 0x18, 0x1c, 0xc0, 0x03, 0x7c, 0xc0, 0x67, 0x0c, 0x03,
	0xf8, 0xff, 0x0f, 0x00, 0xf8, 0xff, 0x60, 0x00, 0x00, 0x00, 0x00, 0x00, 0x00, 0x00, 0x00, 0x00,
	0xf0, 0xff, 0x0f, 0x00, 0x00, 0x00, 0x40, 0x00, 0x00, 0x00, 0x00, 0x00, 0x00, 0x00, 0x00, 0x00,
	0xe0, 0xff, 0x0f, 0x3f, 0x00, 0x00, 0x40, 0x00, 0x00, 0x00, 0x00, 0x00, 0x00, 0x00, 0x00, 0x00,
	0xe0, 0xff, 0x0f, 0xc0, 0x01, 0x00, 0x3e, 0x00, 0x00, 0x00, 0x00, 0x00, 0x00, 0x00, 0x00, 0x00,
	0xc0, 0xff, 0x0f, 0x00, 0xff, 0xff, 0x11, 0x00, 0x00, 0x00, 0x00, 0x00, 0x00, 0x00, 0x00, 0x00,
	0x80, 0xff, 0x1f, 0x00, 0x00, 0x00, 0x10, 0x00, 0x00, 0x00, 0x00, 0x00, 0x00, 0x00, 0x00, 0x00,
	0x00, 0xfc, 0xff, 0x01, 0x00, 0x00, 0x10, 0x00, 0x00, 0x00, 0x00, 0x00, 0x00, 0x00, 0x00, 0x00,
	0x00, 0xfc, 0xff, 0x7f, 0x00, 0x00, 0x0f, 0x00, 0x00, 0x00, 0x00, 0x00, 0x00, 0x00, 0x00, 0x00,
	0x00, 0xf8, 0xff, 0xff, 0xff, 0xff, 0x00, 0x00, 0x00, 0x00, 0x00, 0x00, 0x00, 0x00, 0x00, 0x00,
	0x00, 0xe0, 0xff, 0xff, 0xff, 0x6f, 0x00, 0x00, 0x00, 0x00, 0x00, 0x00, 0x00, 0x00, 0x00, 0x00,
	0x00, 0x00, 0xfc, 0xff, 0xff, 0x1f, 0x00, 0x00, 0x00, 0x00, 0x00, 0x00, 0x00, 0x00, 0x00, 0x00,
	0x00, 0x00, 0xfc, 0xff, 0xff, 0x07, 0x00, 0x00, 0x00, 0x00, 0x00, 0x00, 0x00, 0x00, 0x00, 0x00,
	0x00, 0x00, 0xfc, 0xff, 0xff, 0x00, 0xff, 0xff, 0x3f, 0x00, 0x00, 0x00, 0xfe, 0xff, 0x7f, 0x00,
	0x00, 0x00, 0x00, 0x00, 0x00, 0x80, 0x00, 0x00, 0x40, 0x00, 0x00, 0x00, 0x01, 0x00, 0x80, 0x00,
	0x00, 0x00, 0x00, 0x00, 0x00, 0x40, 0x00, 0x00, 0x80, 0x00, 0x00, 0x80, 0x00, 0x00, 0x00, 0x01,
	0x00, 0x00, 0x00, 0x00, 0x00, 0x40, 0x33, 0x1e, 0x9e, 0x00, 0x00, 0x80, 0x66, 0x3c, 0x3c, 0x01,
	0x00, 0x00, 0x00, 0x00, 0x00, 0x40, 0x33, 0x33, 0xb3, 0x00, 0x00, 0x80, 0x66, 0x66, 0x66, 0x01,
	0x00, 0x00, 0x00, 0x00, 0x00, 0x40, 0x33, 0x33, 0x83, 0x00, 0x00, 0x80, 0x66, 0x66, 0x06, 0x01,
	0x00, 0x00, 0x00, 0x00, 0x00, 0x40, 0x33, 0x3f, 0x9e, 0x00, 0x00, 0x80, 0x66, 0x7e, 0x3c, 0x01,
	0x00, 0x00, 0x00, 0x00, 0x00, 0x40, 0x33, 0x03, 0xb0, 0x00, 0x00, 0x80, 0x66, 0x06, 0x60, 0x01,
	0x00, 0x00, 0x00, 0x00, 0x00, 0x40, 0x3e, 0x33, 0xb3, 0x00, 0x00, 0x80, 0x7c, 0x66, 0x66, 0x01,
	0x00, 0x00, 0x00, 0x00, 0x00, 0x40, 0x30, 0x1e, 0x9e, 0x00, 0x00, 0x80, 0x60, 0x3c, 0x3c, 0x01,
	0x00, 0x00, 0x00, 0x00, 0x00, 0x40, 0x33, 0x00, 0x80, 0x00, 0x00, 0x80, 0x66, 0x00, 0x00, 0x01,
	0x00, 0x00, 0x00, 0x00, 0x00, 0x40, 0x1e, 0x00, 0x80, 0x00, 0x00, 0x80, 0x3c, 0x00, 0x00, 0x01,
	0x00, 0x00, 0x00, 0x00, 0x00, 0x40, 0x00, 0x00, 0x80, 0x00, 0x00, 0x80, 0x00, 0x00, 0x00, 0x01,
	0x00, 0x00, 0x00, 0x00, 0x00, 0x80, 0x00, 0x00, 0x40, 0x00, 0x00, 0x00, 0x01, 0x00, 0x80, 0x00,
	0x00, 0x00, 0x00, 0x00, 0x00, 0x00, 0xff, 0xff, 0x3f, 0x00, 0x00, 0x00, 0xfe, 0xff, 0x7f, 0x00,
	0x00, 0x00, 0x00, 0x00, 0x00, 0x00, 0x00, 0x00, 0x00, 0x00, 0x00, 0x00, 0x00, 0x00, 0x00, 0x00,
	0x00, 0x00, 0x00, 0x00, 0x00, 0x00, 0x00, 0x00, 0x00, 0x00, 0x00, 0x00, 0x00, 0x00, 0x00, 0x00
};

// Array of all bitmaps for convenience. (Total bytes used to store images in PROGMEM = 1040)
const int epd_bitmap_allArray_LEN = 1;
const unsigned char* epd_bitmap_allArray[1] = {
	epd_bitmap_gm_machine
};
Some technical nuances to keep in mind:
- Your image should be sized exactly for your display or prepared to be partially shown
- Monochrome displays only understand black and white—no grayscale
- The orientation matters (horizontal vs. vertical byte order)
- The byte array can become quite large for complex images, so be mindful of your microcontroller's memory
ENCYCLOPEDIA [Easy: Success] — The SH1106 and SSD1306 are common OLED controllers. While similar, they have subtle addressing differences. The u8g2 library handles both admirably, a testament to the developer's attention to technical minutiae.
From Static to Dynamic
INTERFACING [Hard: Success] — Your fingers dance across the controls, eyes darting between code and reality. This is the interface to another world—where your creations flicker to life. Feel it in your hands: the power to animate the inanimate.
Now that we understand how to convert images to byte arrays and display them, we can level up to create actual UI elements for embedded projects. I believe people process information better visually, and a well-designed UI, even on tiny screens, significantly improves user experience. As they say, God gave us eyes for a reason.
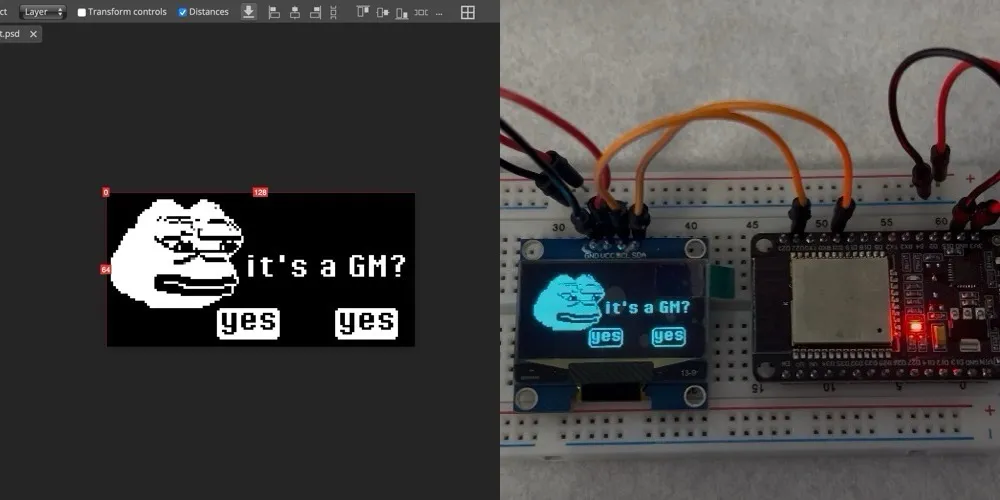
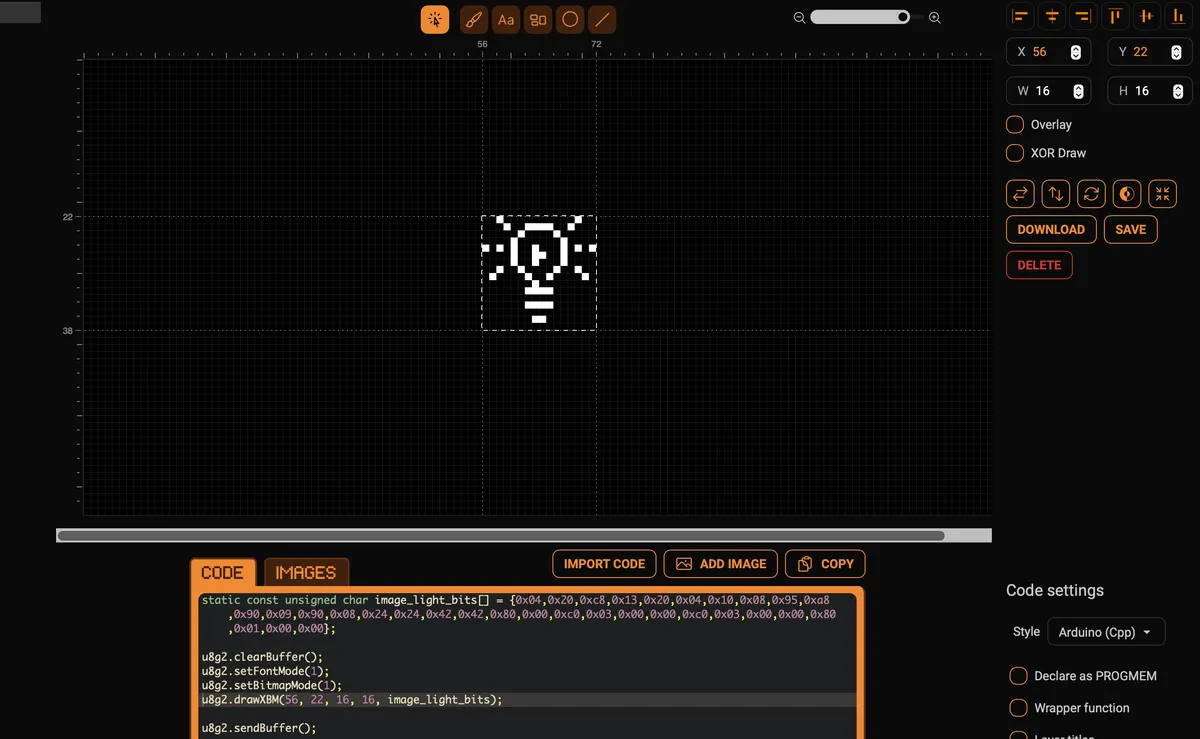
For my GM Machine project, I used Photoshop and image2cpp, but I recently discovered an open-source tool called Lopaka that combines both functions. Same process, better workflow. This is where you get to engage the creative part of your brain and let inspiration flow—it's drawing time!
Design First, Code Later
Before you start drawing, prepare your canvas. Set the dimensions to match your display—in my case, 128x64 pixels. This is crucial because it gives you a pixel-perfect preview. When you place a UI element at coordinates (25,30) in your design, you'll use those exact same coordinates in your code. This eliminates the frustrating trial-and-error of positioning elements on your screen.
I'm not an accomplished artist, but here's a simple trick: find reference images online, place them on a separate layer in your canvas, and trace over them. Soon enough, you'll have a collection of custom UI elements that express your unique style.
In the traditional workflow with Photoshop and image2cpp:
- Create each UI element on a separate layer
- Export each layer as a separate image
- Convert each image to a byte array
- Use the position data from Photoshop to place elements in code
With Lopaka, this process is streamlined as it handles both drawing and conversion, automatically tracking element positions as you move them on the canvas.
RHETORIC [Hard: Success] — Every pixel tells a story. What will yours say? Will your interface seduce with elegant minimalism, or overwhelm with chaotic exuberance? This is your manifesto, written in light.
The GM Machine: From Concept to Animation
Let me walk you through how I built the interface for my GM Machine project. I needed to create a slot machine with animated reels, status indicators, and interactive elements that would respond to button presses.
First, I sketched the overall layout on paper, then recreated it digitally, matching my OLED's 128x64 dimensions.
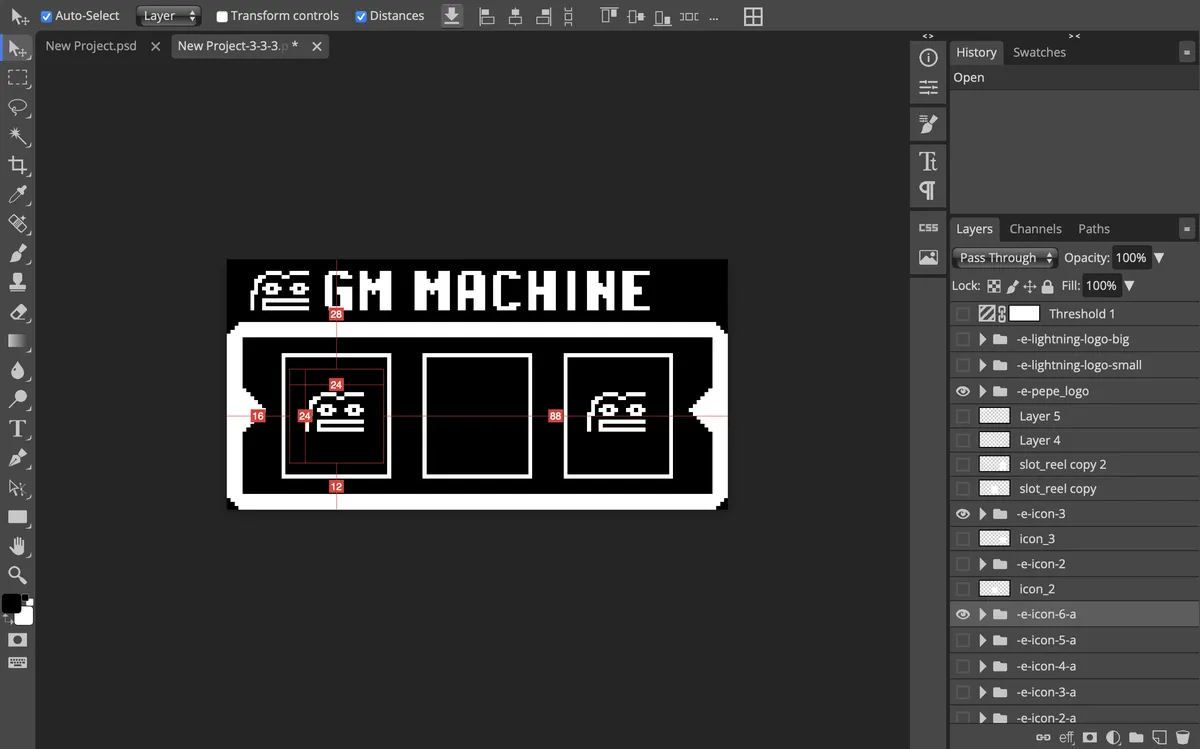
For each element—the pepe logo, the machine frame, the spinning reels—I created separate byte arrays. This allowed me to keep the frame static while animating only the reels, saving precious processing power.
The magic happens when you start making these elements dynamic—responding to input, changing states, or animating. Breaking your UI into separate components rather than a single image gives you this flexibility and also optimizes memory usage. Loading small UI components as needed uses less RAM than constantly refreshing full-screen images.
PERCEPTION [Medium: Success] — Notice how the UI elements aren't just static images? They respond—they breathe. That slight animation in the corner draws the eye like a moth to flame. This isn't just information display; it's conversation.
Here's how I implemented the slot machine animation:
// pin definitions
#define OLED_SCL 6
#define OLED_SDA 7
#define BUTTON_PIN 10

// initialize u8g2 for ssd1306 display
U8G2_SSD1306_128X64_NONAME_F_HW_I2C u8g2(U8G2_R0, /* reset=*/ U8X8_PIN_NONE);

// bitmap for pepe logo
const unsigned char epd_bitmap_pepe_logo[] PROGMEM = {
    0x00, 0x00, 0x00, 0x00, 0x00, 0x00, 0xe0, 0xf9, 0x18, 0x06, 0x0c, 0x00, 0xe4, 0x70, 0xb4, 0xd9,
    0xe6, 0x70, 0x02, 0x00, 0xf2, 0xff, 0x12, 0x00, 0xf2, 0xff, 0x00, 0x00, 0x00, 0x00, 0x00, 0x00};

// bitmap for slot machine frame
const unsigned char epd_bitmap_slot_machine[] PROGMEM = {
    0xf8, 0xff, 0xff, 0xff, 0xff, 0xff, 0xff, 0xff, 0xff, 0xff, 0xff, 0xff, 0xff, 0xff, 0xff, 0x1f,
    /* ... (truncated for brevity) ... */
    0xfc, 0xff, 0xff, 0xff, 0xff, 0xff, 0xff, 0xff, 0xff, 0xff, 0xff, 0xff, 0xff, 0xff, 0xff, 0x3f,
    0xf8, 0xff, 0xff, 0xff, 0xff, 0xff, 0xff, 0xff, 0xff, 0xff, 0xff, 0xff, 0xff, 0xff, 0xff, 0x1f};

// bitmap for slot reel icon
const unsigned char epd_bitmap_icon_slot_reel[] PROGMEM = {
    0x00, 0x00, 0x00, 0x00, 0x00, 0x00, 0x00, 0x00, 0x00, 0x00, 0x00, 0x00, 0x00, 0x00, 0x00, 0x00,
    0x00, 0x00, 0x00, 0xcf, 0x07, 0xc0, 0x30, 0x00, 0x60, 0x00, 0x00, 0x20, 0x87, 0x03, 0xa0, 0xcd,
    0x06, 0x30, 0x87, 0x03, 0x10, 0x00, 0x00, 0x90, 0xff, 0x07, 0x90, 0x00, 0x00, 0x90, 0xff, 0x07,
    0x00, 0x00, 0x00, 0x00, 0x00, 0x00, 0x00, 0x00, 0x00, 0x00, 0x00, 0x00, 0x00, 0x00, 0x00, 0x00,
    0x00, 0x00, 0x00, 0x00, 0x00, 0x00, 0x00, 0x00};

// animation parameters
#define WAVE_AMPLITUDE 2
#define WAVE_SPEED 0.2
#define CHAR_SPACING 7
const char* TITLE = "GM MACHINE";

// spin animation parameters
#define SPIN_INITIAL_SPEED 40.0
#define SPIN_DECELERATION 0.95
#define MIN_SPIN_SPEED 2.0
#define ICON_SIZE 24

#define REEL_BORDER 1      // border thickness
#define REEL_TOP 25        // y coordinate where visible reel area starts
#define REEL_BOTTOM 52     // y coordinate where visible reel area ends
#define REEL_HEIGHT (REEL_BOTTOM - REEL_TOP)
#define LEFT_REEL_X 16     // x coordinate of left reel
#define MIDDLE_REEL_X 52   // x coordinate of middle reel
#define RIGHT_REEL_X 88    // x coordinate of right reel

#define VISIBLE_TOP (REEL_TOP + REEL_BORDER)
#define VISIBLE_BOTTOM (REEL_BOTTOM - REEL_BORDER)

// animation states
enum SpinState {
    IDLE,
    SPINNING,
    STOPPING
};

float currentSpeed = 0;
float yOffset = 0;
SpinState spinState = IDLE;
unsigned long lastDebounceTime = 0;
unsigned long debounceDelay = 50;
bool buttonState = HIGH;
bool lastButtonState = HIGH;

void setup() {
    Wire.begin(OLED_SDA, OLED_SCL);
    u8g2.begin();
    u8g2.clearBuffer();
    u8g2.setFont(u8g2_font_7x14B_tr);
    pinMode(BUTTON_PIN, INPUT_PULLUP);
}

void drawWaveText(const char* text, uint8_t baseY, float time) {
    uint8_t textWidth = u8g2.getStrWidth(text);
    uint8_t startX = (128 - textWidth) / 2 + CHAR_SPACING;

    for(uint8_t i = 0; text[i] != '\0'; i++) {
        char currentChar[2] = {text[i], '\0'};
        float offset = sin(time + i * 0.5) * WAVE_AMPLITUDE;
        uint8_t charWidth = u8g2.getStrWidth(currentChar);
        u8g2.drawStr(startX, baseY + offset, currentChar);
        startX += charWidth;
    }
}

void drawAnimatedIcon(float offset) {
    // calculate base position
    int baseY = REEL_TOP + (int)offset;

    // draw icons for all three reels
    for(int i = -1; i <= 1; i++) {
        int y = baseY + (i * ICON_SIZE);

        // wrap around if needed
        while(y < REEL_TOP - ICON_SIZE) y += ICON_SIZE * 2;
        while(y > REEL_BOTTOM) y -= ICON_SIZE * 2;

        // only draw if the icon will be at least partially visible
        if(y + ICON_SIZE >= REEL_TOP && y <= REEL_BOTTOM) {
            // enable clipping for each reel
            u8g2.setClipWindow(LEFT_REEL_X + REEL_BORDER, VISIBLE_TOP, LEFT_REEL_X + ICON_SIZE - REEL_BORDER, VISIBLE_BOTTOM);
            u8g2.drawXBMP(LEFT_REEL_X, y, ICON_SIZE, ICON_SIZE, epd_bitmap_icon_slot_reel);

            u8g2.setClipWindow(MIDDLE_REEL_X + REEL_BORDER, VISIBLE_TOP, MIDDLE_REEL_X + ICON_SIZE - REEL_BORDER, VISIBLE_BOTTOM);
            u8g2.drawXBMP(MIDDLE_REEL_X, y, ICON_SIZE, ICON_SIZE, epd_bitmap_icon_slot_reel);

            u8g2.setClipWindow(RIGHT_REEL_X + REEL_BORDER, VISIBLE_TOP, RIGHT_REEL_X + ICON_SIZE - REEL_BORDER, VISIBLE_BOTTOM);
            u8g2.drawXBMP(RIGHT_REEL_X, y, ICON_SIZE, ICON_SIZE, epd_bitmap_icon_slot_reel);
        }
    }
    // reset clipping window
    u8g2.setMaxClipWindow();
}

void startSpin() {
    if(spinState == IDLE) {
        spinState = SPINNING;
        currentSpeed = SPIN_INITIAL_SPEED;
        yOffset = 0;
    }
}

void updateSpin() {
    if(spinState == SPINNING || spinState == STOPPING) {
        // update position
        yOffset += currentSpeed;
        if(yOffset >= ICON_SIZE) {
            yOffset -= ICON_SIZE;
        }

        // update speed
        currentSpeed *= SPIN_DECELERATION;

        // check if we should stop
        if(spinState == STOPPING && currentSpeed < MIN_SPIN_SPEED) {
            yOffset = round(yOffset / ICON_SIZE) * ICON_SIZE;
            spinState = IDLE;
            currentSpeed = 0;
        }
    }
}

void handleButton() {
    int reading = digitalRead(BUTTON_PIN);

    if(reading != lastButtonState) {
        lastDebounceTime = millis();
    }

    if((millis() - lastDebounceTime) > debounceDelay) {
        if(reading != buttonState) {
            buttonState = reading;
            if(buttonState == LOW) {
                if(spinState == IDLE) {
                    startSpin();
                } else if(spinState == SPINNING) {
                    spinState = STOPPING;
                }
            }
        }
    }

    lastButtonState = reading;
}

void loop() {
    static float animationTime = 0;

    handleButton();
    updateSpin();

    u8g2.clearBuffer();

    // draw pepe logo
    u8g2.drawXBMP(13, 0, 16, 16, epd_bitmap_pepe_logo);

    // draw animated title
    drawWaveText(TITLE, 14, animationTime);

    // draw slot machine frame
    u8g2.drawXBMP(0, 16, 128, 48, epd_bitmap_slot_machine);

    // draw spinning icons
    drawAnimatedIcon(yOffset);

    u8g2.sendBuffer();

    animationTime += WAVE_SPEED;
    if(animationTime >= 2 * PI) {
        animationTime = 0;
    }

    delay(16);
}
The animation effect is created by continuously repositioning the same icon bitmap at different y-coordinates and using clever clipping windows to only show portions visible within each reel slot. As the yOffset value changes based on the current speed, the icons appear to scroll smoothly. Button presses toggle between different animation states (idle, spinning, and stopping), which control the speed and behavior of this movement.
This technique is more memory-efficient than storing multiple animation frames as separate byte arrays, since it reuses the same graphics data but creates movement through positioning and clipping.
This approach clicked for me when I realized I was essentially recreating how games and other graphical applications work—placing individual elements at specific coordinates and manipulating them programmatically. Suddenly, the concept of sprites and UI frameworks made intuitive sense.
ELECTROCHEMISTRY [Easy: Success] — The rush when you see your creation come alive! The OLED's glow illuminates your face as the animation loops perfectly. One more hit of this feeling and you'll be chasing it forever. It's... magnificent.
INLAND EMPIRE [Medium: Success] — Sometimes the machine whispers back to you in binary. The pixels arrange themselves into patterns you didn't program, little ghosts in the machine. Or maybe that's just what happens when you've been debugging too long.
Technical Tips for Disco-worthy Displays
ENCYCLOPEDIA [Medium: Success] — The SSD1306 driver communicates via I²C or SPI protocols, both allowing your microcontroller to transmit data serially. I²C requires fewer pins but SPI offers superior speed—an engineering trade-off as old as time itself.
Here are some hard-earned lessons to help you create stunning UIs on tiny displays:
Memory Management
- Keep images as small and simple as possible
- Use 1-bit color mode when preparing images
- Consider horizontal vs. vertical byte orientation based on your animation needs
- Use program memory (PROGMEM) for storing byte arrays to free up RAM
Performance Optimization
- Only update portions of the screen that change
- For animations, prepare all frames in advance
- Consider using partial updates when supported
- Find the sweet spot for refresh rates (too fast drains battery, too slow looks choppy)
Visual Design for Small Screens
- High contrast is essential—subtle gradients get lost
- Leave breathing room around text (1-2 pixels minimum)
- Use icons of at least 8x8 pixels for recognizability
- Test your UI in different lighting conditions
VOLITION [Easy: Success] — Push beyond the basic examples. The satisfaction of building something truly yours, something that dances and flickers exactly as you imagined—it's worth every debugging session, every late night squinting at microscopic pixels.
Conclusion: Your Display, Your Disco
ESPRIT DE CORPS [Medium: Success] — You're part of something now—the underground fellowship of embedded artists. They'll recognize your work by its signature movements, the particular way your pixels dance. You've added your voice to the chorus.
What began as boring numbers on a plain OLED has transformed into an interactive, animated interface that brings personality and usability to embedded projects. The journey from static to dynamic displays has not only improved my projects visually but changed how I think about user interaction in embedded systems.
The ability to create custom UI elements—whether it's animated icons, responsive buttons, or dynamic status indicators—elevates your project from functional to delightful. It's the difference between "it works" and "wow!"
I encourage you to experiment with your own designs. Start simple: perhaps a custom loading animation or a set of status icons. As you become more comfortable, try building complete menu systems or interactive displays. The process itself becomes addictive—watching your pixels come alive exactly as you envisioned them.
Remember that even limited hardware can deliver impressive visual experiences with the right approach. Your embedded projects don't have to settle for boring text displays—they deserve a little disco too.
SHIVERS [Legendary: Success] — In the dance of electrons across the tiny blue screen, there's a hint of something profound—a reminder that all interfaces are windows between worlds. Yours just happens to glow in the dark.